About #
Not So Rigid Designer is online weaving software for rigid heddle weavers. You can create designs for your rigid heddle loom using pick up sticks, colors, and different threading options in one or more heddles, convert shaft loom designs from other weaving software, and get automatically generated threading diagrams!
What's New #
The following features are newly available for Basic users:
- Import WIF files: Load WIF files from other weaving software or repositories to convert shaft loom designs to rigid heddle designs with multiple heddles and/or pick up sticks, up to 4 shafts for Basic, and 10 for Premium.
- Reorder heddles and sticks: Rearrange the order of the heddles and or pick up sticks. This can be helpful to tweak the threading and make designs a bit easier to weave.
Supported Devices #
Not So Rigid Designer runs in your web browser. For the best experience use it on a computer with an up to date browser like Firefox or Chrome. Most functionality will work on tablets and phones, however, they may struggle to load larger designs.
How To Read Patterns #
The format is inspired by weaving drafts used by shaft loom weavers, but adapted for rigid heddle. The video below shows an overview of how to read the patterns.
There are 3 main areas of a design:
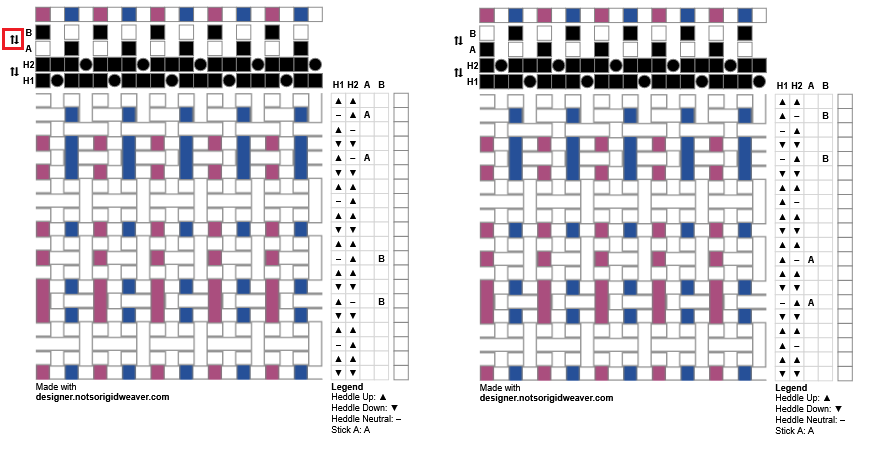
- Threading (Top)
The rows labelled H1-H3 are the heddles; a circle represents a hole and a square represents a slot. The rows labelled with a single letter (A, and B in the example) represent pick up sticks. A black square on a pick up stick represents a thread that has been picked up by that stick. The warp colors are shown in the top bar.
- Weaving Sequence (Right)
Each column represents a different heddle and stick. Clicking on the heddles and sticks will toggle between valid positions for that heddle or stick. This is like the treadling or lift plan section of a shaft loom draft. There's also a column near the right for weft colors.
- Drawdown (Middle)
This shows the interaction of the warp and weft threads - a preview of the final fabric. This is the same as the drawdown used in shaft weaving drafts; like those drafts, it doesn't account for all of the 3d interactions of threads and sometimes the fabric can look quite different after wet finishing as threads settle into place and shrink.
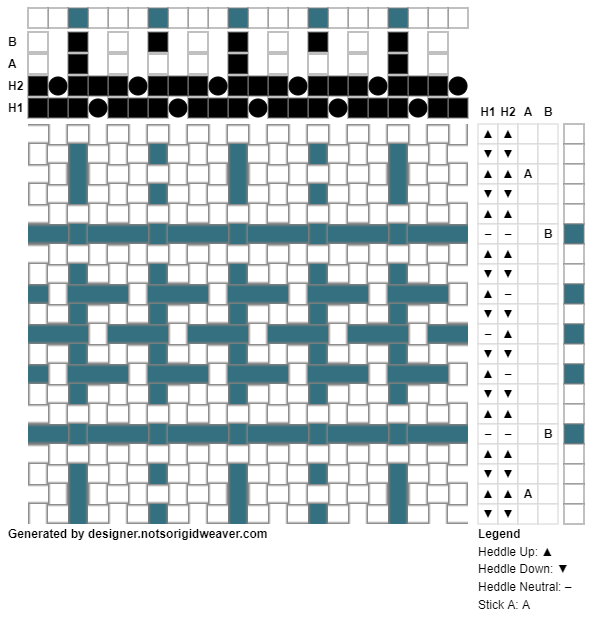
The example above shows a design using 2 heddles and 2 pick up sticks. H1 represents the front heddle, and the heddles are in the 'standard' 2 heddle arrangement. Stick A is 1 down, 1 up, 3 down, 1 up, 3 down, 1 up, while stick B is 1 down, 1 up. The warp and the weft are mostly white, with a teal color in the rows and columns where there are floats. Stick A is used with the heddle in Up to produce warp floats, while stick B is used with the heddle in neutral to produce weft floats. The heddles are mostly used up and down together, except in the middle area where a pattern is produced by mixing up and neutral positions.
You can create designs using up to 3 heddles and up to 10 pick up sticks. Heddle 1 is the 'Front' heddle on the loom.
At the top of the design is the title and some buttons to Undo, Redo, Save, Edit a Copy, Download Image, set the size to small, medium, large, or extra large, display some information about the draft, and, on the far right, show the keyboard shortcuts.

You can edit the title and save to update the title. The Save button will also save any changes in the design.
Undo/Redo let you undo and redo changes to your design.
Edit a Copy will save the current design as a new design with a title starting with 'Copy of'. This is great when you've started tweaking your design but still want to keep an older version.
Download Image will save an image of the current design (if on the Design tab) or threading diagram (if on the Threading tab) to your device. You can print this out, share it on social media, add it to project notes on Ravelry. This image is yours to do with as you please, including using it in a pattern for sale or class notes.
Clicking one of s, m, l, xl will set the size of the design or the threading diagram. This also affects the downloaded images. The current size is highlighted in grey. You can also use your browser's zoom functionality to further tweak the size.
The Info button will display some information about the design - currently the number of threads in the warp and weft overall, and by each color.
The Shortcuts button shows the keyboard shortcuts. They're noted here in a different font and color, like c to toggle the color modes.
The Lock button will disable editing and hide the sidebar to prevent accidental changes, such as while weaving or threading your loom.
.png)
When the design is locked, the title not be editable and show (Locked), and the lock icon will be red. Press the lock icon to unlock the design to resume editing.
Many of the more complex functions described below are found in the Sidebar. This is on the left hand side of the screen on larger screens, and below the design on smaller screens like a phone. Each section has a header which in most cases includes a summary of what's currently enabled; click on this header to expand or collapse the section.
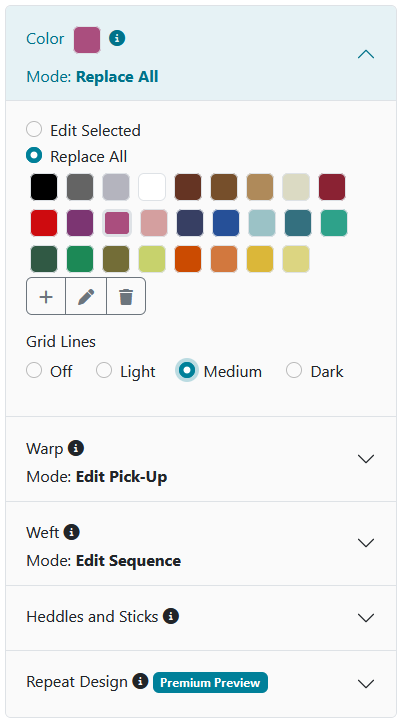
This shows the sidebar with the Color section expanded, showing the starter color palette.
Create a Design #
If you're using the demo version, the basic design is already created. Refresh the page to clear it and start fresh.
To create a design, click on Designs on the left, then click the Create Design button. Give your design a title, and optionally set the number of warp and weft threads, the a number of pick up patterns and heddles, and your starting color palette. You can edit all of these after starting.
Select your starting color palette #
You can choose to start with just 2 colors, black and white, or, a starter palette of 26 colors that cover a range of basic colors in a few shades. In both cases you can add, remove, and change colors after you start a design.
Choose Black and White if:
- You already have some yarn in mind and want to precisely match it
- You want to work with many similar colors, for example, a gradient with 5 different shades of blue
- You'd like to just focus on texture
Choose the Starter Palette if:
- You want a starting point for colors rather than a blank slate
- You prefer not to fiddle with a color picker to get a close match
- You want to be able to quickly make major color changes ("Red" to "Dark Purple" to "Blue") and then refine later
Edit your Design #
The Edit modes are where you change the threading and heddle positions. Shortcut e returns you to the default of Edit for warp and Edit Single Heddle for weft, while f also goes to Edit for warp but Edit All Heddles for weft.
Set the Threading (Warp) - Pick up sticks and heddles #
When in Edit mode for the warp, you can add or remove threads from pick up sticks, and change threads from hole to slots and vice versa. The heddles are represented by circles (for holes) and squares (for slots), while the pick up sticks are the rows of squares above the columns where all heddles are slot threads. Each column represents a thread on the loom.
Clicking on a heddle will change it from a hole to a slot or vice versa. Changing from a slot to a hole will remove all pick up sticks set for that thread. In multi heddle set ups, each thread can only go through one hole, so if it's already in a hole in another heddle, the hole will move.
Clicking on a pick up stick will change it from on the stick (black) to not on the stick (white) the pick up stick. If starting from a design phrased as "1 up, 2 down", you would want one black square, then 2 white squares.
Note the video is out of date, there is now one Edit mode for editing the sticks and heddles.
Set the Weaving Sequence (Weft) #
The weaving sequence area on the right sets the position of heddles and pick up sticks for that row of the weft. A heddle can be Up (▲), Down (▼), or Neutral (–); Neutral heddles replace down heddles when there are other heddles that are up or a pick up stick is in place. The following combinations are valid:
- A mix of Up (▲) and Neutral (–) heddles, and sticks
- A mix of Down (▼) and Neutral (–) heddles, with no sticks
- All heddles Neutral (–), with at least one stick in use.
Each column represents a heddle (H1, H2, H3) or a stick (A, B, C, etc).
In Edit Single Heddle mode, when clicking on a heddle:
- If the heddle is Up, it will go to Neutral if there are any other Up heddles or sticks in that row, otherwise it will go to Down.
- If the heddle is Neutral, it will go to Up if there are any up heddles or sticks, and Down otherwise.
- If the heddle is Down, it will go to Up if there are no sticks and any other heddles are Neutral, otherwise it will go to Neutral.
This means that you may need to click in a few places to make major changes to a shed in this mode.
In Edit All Heddles mode, when clicking on a heddle:
- If the heddle is Up, all heddles in that row will switch to Down, and any pick up sticks will be removed.
- If the heddle is Down or Neutral, all heddles in that row will switch to Up.
In other words, it "forces" other heddles to change with it.
In both of these modes, clicking on a cell for a stick will add or remove the stick. If the heddles are all neutral, and you remove the last stick, the heddles will go to down. If any heddles are down, and you add a stick, the down heddles will go to neutral. If you selected "Allow using multiple pick up patterns together" when creating your design, you can have multiple sticks, otherwise, clicking on another stick position will remove the existing stick from that row.
Adding and removing warp and weft #
Select the appropriate Warp or Weft mode from the sidebar on the left (larger screens), or below on smaller screens, or using one of the keyboard shortcuts you can find in the shortcuts menu. Some, but not all, shortcuts affect both warp and weft.
To add a warp thread, choose the type of thread you want to add from the Warp Mode section - hole, slot, or, both a hole and a slot (shortcuts h, s, and b). Then click on the heddle row where you want to add the thread; the selected thread will be highlighted in green. Similarly, to remove a warp thread, select Remove as the Warp mode, and the selected thread will be highlighted in red. To stop adding or removing threads, select Edit as the warp mode. Warp threads (holes or slots) are inserted to the right of the selected thread, and in multiple heddle setups, the hole will go in the heddle you clicked on.
To add or remove a weft thread, select add or remove from the Weft mode, and then click anywhere in the weaving sequence area. The square will highlight in green (when adding) or red (when removing) instead of the default teal. Weft threads are inserted above the selected row. The shortcut key for adding a weft is a and for removing one is r.
To stop adding or removing threads, go back to one of the edit modes, either via the warp and weft options in the sidebar, or shortcuts e and f which both set the warp mode to Edit, and the weft mode to Edit Single Heddle and Edit All Heddles respectively.
On the loom, 2 holes or 2 slots next to each other can represent either 2 yarns through the same hole or slot, or, an empty slot between 2 holes or vice versa, depending on the desired sett of the fabric.
Changing Colors #
The currently selected color is shown in the header of the Color area of the sidebar. The warp and weft colors are controlled using the top row (warp) and rightmost column (weft), and show throughout the drawdown area. You can choose between Edit Selected and Replace All color modes here, or toggle between them by pressing c.
Change a single color or adjacent colors (Edit Selected) #
To change the color, choose a color from the color palette in the Color Selection menu in 'Edit Selected' mode, then click on the warp or weft color at the top or the right of the design.
You can also click and drag to change several adjacent thread colors at once. This currently works best with a mouse; on a touch device it works best if you zoom in.
Replace All threads of a color (Replace All) #
You can replace all of a color in the warp or weft. This is useful when you have several stripes of a color, or a large area of the color that is cumbersome to drag. Set the mode to Replace All, select a color, and then click on a color in the design. If you click on a warp color, all threads of that color in the warp will change, likewise for the weft; if you want to change the color in warp and weft, click on one and then the other, or, change the color in the palette.
Change the color palette #
The buttons below the colors let you change the color palette. You can add a new color, change an existing color, and delete a color.
To add a color, click on the '+' button, and use the color picker to choose a color. You can change the hue by dragging along the bottom, and pick different shades in the area on top. The color picker starts with the currently selected color so you can easily make a similar color. The button will be disabled if you've hit the limit of colors based on your subscription type (3 for the demo, 26 for basic, and 50 for premium).
To change a color, select it, then click the pencil button, which will open up the color picker as above. This will change the color in the palette, and everywhere it's used in the design.
To delete a color, select it and then click the trash can button. You can't delete a color that's in use in the design (change it to something else first!).
Change the grid lines #
The grid lines show in the drawdown and help distinguish different threads. You can choose to turn them off, to focus on color, or one of 3 different shades of grey for more or less contrast with your design, using the radio buttons below the color palette. The animation below shows the different options - the default color is a medium grey, light is not quite white and dark is not quite black.
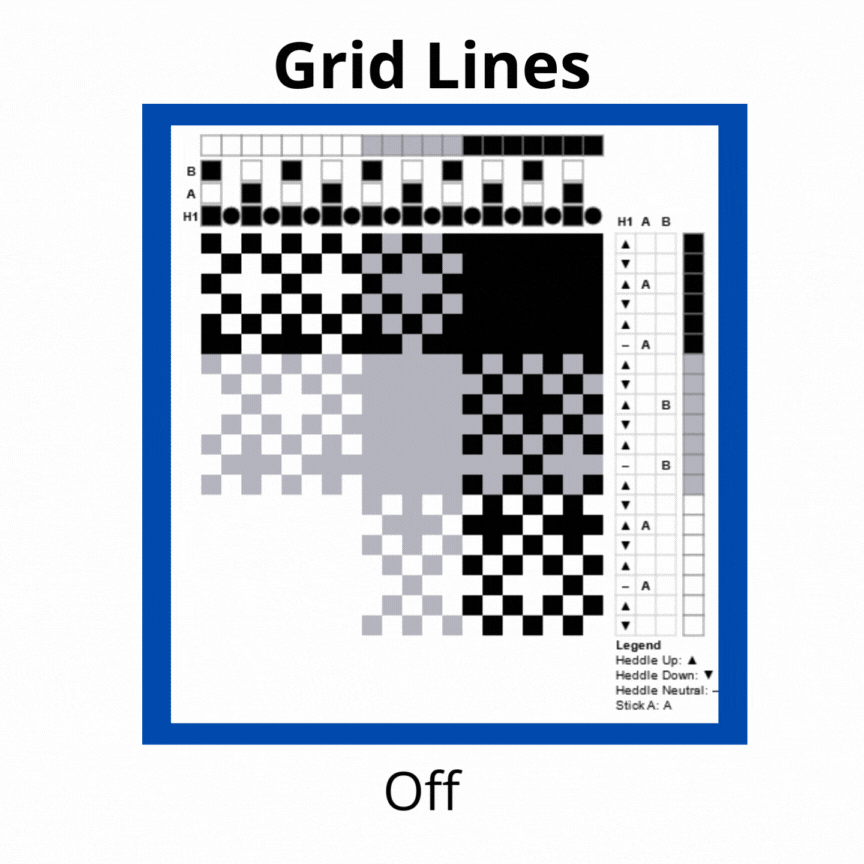
If the grid lines are off, you won't see textures in areas where warp and weft are the same, but it can help you focus on color. Your selection here will show when you download an image, but isn't currently saved when you reload.
Set up Heddles and Sticks #
The Heddles and Sticks section of the sidebar lets you change the number of heddles and sticks after starting a design, and re-order them. It lets you add, delete, and also toggle allowing multiple pick up patterns in the same row.
To add a heddle or stick, click on the appropriate add button. There is a limit of 3 heddles and 10 pick up sticks, and the buttons will be disabled if you hit it.
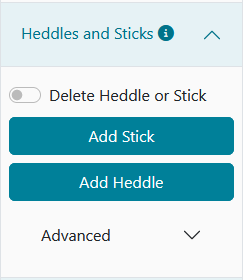
To delete a heddle or stick, ensure the "Delete Heddle or Stick" switch is on (pictured below), and then click on a heddle or stick label. When delete is enabled, the heddle and stick labels will highlight in red when hovered. Turn the switch off when done to prevent accidentally deleting while editing your design.

To reorder the heddles and sticks, click on the "Reorder Heddles and Sticks" switch, and then click on the swap icons that appear between the heddles and or sticks (one of them is highlighted in red in the image below). This moves the patterns around, but the labels are based on the order. This can be enabled at the same time as delete. Changing the order of heddles or sticks has no impact on the design; however changing the order of the heddles (but not sticks) can affect the threading options on the threading tab, so you can also click on "Reorder heddles" on that tab.
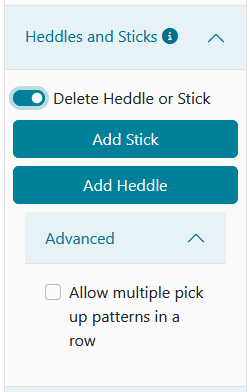
You can also enable or disable using multiple pick up patterns in the same row using the Advanced section. This would usually only make sense if your patterns are mounted on heddle rods and you are lifting more than one to weave the same pick.
Repeat Design #
The repeat design section of the sidebar lets you repeat the entire warp and/or weft multiple times, to quickly build up a larger pattern from a smaller one.
Select the number of repeats you want for each of warp and weft, then hit apply. Leave the value at 1 to leave that part unchanged.
As an example, if you have a design with 10 warp threads and 8 weft threads, setting warp and weft to 2 and hitting apply will result in repeating each of warp and weft to have 20 warp threads (10x2) and 16 weft threads (8x2). If you use the tool a 2nd time, and set warp to 3 and weft to 1, you will end up with 60 warp (20x3) and 16 weft (16x1) threads.
The apply button will be disabled if you would exceed the size limits, or, if the repeats are set to 1 (which would do nothing). On very large designs it may take a few seconds for the changes to apply.
Threading Diagrams #
With multi-heddle designs, there are usually many possible ways to actually thread a rigid heddle loom. The threading diagrams tab lets quickly you see a few possible ways to actually thread your designs through your heddles. Like on the Design tab, you can save the image using the Download Image button, and set the size using the size buttons.
You can see up to 3 different threading options for your design with a maximum of 1, 2, or 3 threads in a slot or hole. For each of these options, you'll see the number of threads, the number of holes and slots used, and the "density" - the number of threads divided by the number of holes and slots. The final sett of your weave is density * DPI of heddle. For example, using a 10 DPI heddle, the design below would be a sett of 5.8 DPI with one thread per hole and slot, 10 EPI at 2 per hole or slot, and 14.3 EPI using up to three threads per hole and slot.
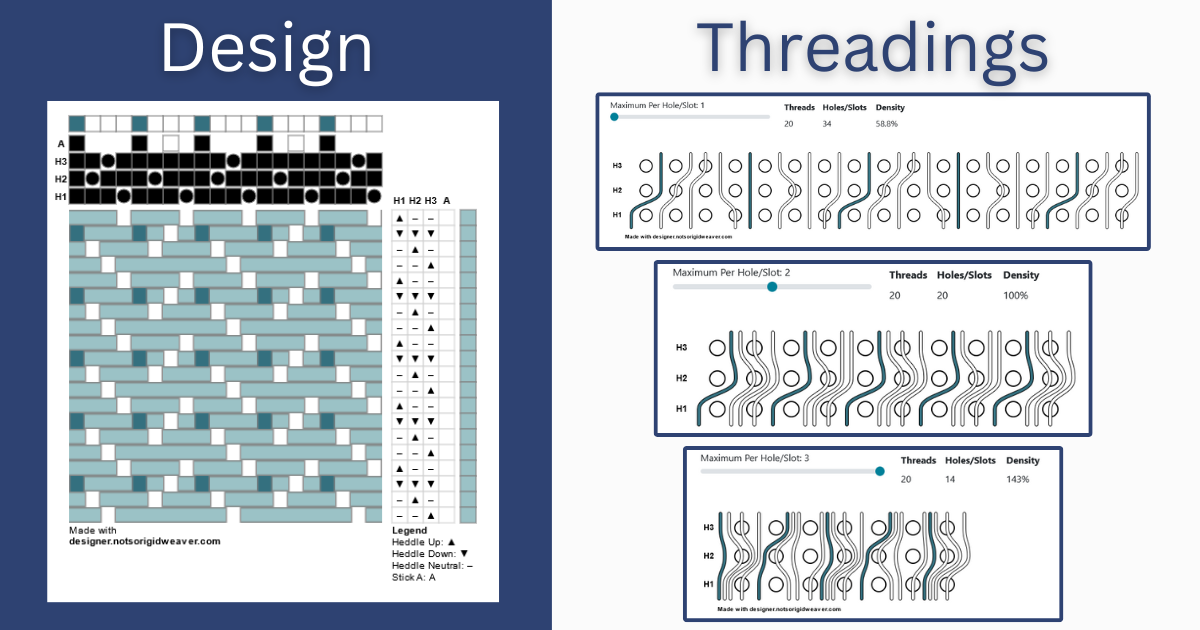
Threading diagrams focus on threading of the heddle only and don't show pick up sticks; they're mostly useful for multi-heddle designs, but can also help you calculate density in more complex single heddle designs.
Import WIF Files #
Load WIF files from other weaving software or repositories to convert shaft loom designs to rigid heddle designs with multiple heddles and/or pick up sticks. Look for the Import WIF button next to the Create Design button on the main page and the design page to bring up the import page where you can select the file and choose some options.
To import a wif file, select the file from your system and select the maximum number of heddles. The number of heddles used in the design may be less than the maximum if it's not needed - a 2 shaft design will use 1 heddle and a 3 shaft design will use no more than 2 heddles. Once you've loaded the design, check the title and adjust if you'd like, and save it so that the preview will show.
The following advanced options also exist to support some special cases, and can usually be left at their default values:
- Use existing mapping (if present): allows you to "round trip" .WIF files exported by Not So Rigid Designer and load them using the same heddles & sticks. It has no effect on most .WIF files, but overrides other import settings for files exported by Not So Rigid Designer. Uncheck this if you have an exported WIF that you want to import differently, for example, to use a different number of heddles.
- Optimize: looks for some common patterns that are useful to rigid heddle weavers. These may change over time. Uncheck this if you want to more closely follow the order in your WIF file, with the first shaft being holes in the first heddle, followed by holes in any further heddles, followed by any sticks, followed by an all slot shaft.
The design will be mapped to the heddles first and then any additional shafts will be set as pick up sticks, up to a maximum of 10 shafts for Premium and 4 shafts for Basic. You may find rearrange heddles and sticks useful after importing your design - this can sometimes make an easier threading pattern.
Designs imported from WIF follow the same size limits and limits on number of colors. If a WIF file is too big, it will be be truncated to fit. WIF files which focus on showing a few repeats of a pattern (e.g. most from Handweaving.net) will usually be fine but WIF files designed to show an entire floor loom project may not be (e.g. some from Handwoven's Pattern Library). WIF files with large color palettes will be simplified to attempt to fit within the limits but will not load if the design is using a large number of colors.
The default name is based on the Title inside the WIF or the filename if not present; you can change this after loading the design.
WIF files from Handweaving.net, Fibreworks, TempoWeave, QuickDraw, and Treadl have been tested and known to work (and should produce helpful errors if they are too big etc.). If you encounter "Unable to parse WIF" for something that works in more than just the program that created it, I'd love to add it to my test cases, send it to support@notsorigidweaver.com. Even better if you can make a very simple file that fails! I am especially interested in files from weaving software not mentioned elsewhere as each program has it's quirks in how it saves the data. SeiZen is an online tool (more for band weaving) which has a WIF export option but they are not valid .WIF files and do not work in this or other software.
Size Limit #
When creating a design, the largest dimension can be up to 500, which is the limit for Basic users. Premium users can make designs up to 1000 warp or weft threads by using WIF import or the repeat tool.
- Basic users can create designs up to 225 x 225 as a square, or, an equivalent overall area as a rectangle, up to a maximum of 500 in either dimension, like 100x500, or 200x250.
- Premium users can create designs up to 300 x 300 as a square, or, an equivalent overall area as a rectangle, up to a maximum of 500 in either dimension at creation time, which can be expanded to a maximum of 1000, like 150x600 or 90x1000.
It is typically easier to create a smaller design and use the repeat tool to make it bigger rather than starting with a very large design. Very large designs may be a little slower to load and respond to changes, or not load at all on some less powerful devices.
Premium Features #
The following features are available for premium subscribers. Major new features are released in "Preview" to Premium users for several weeks or months before being released more widely.
WIF Export #
WIF files, or Weaving Information Format, can be used in many other weaving programs. You can export to WIF from the list of designs (Designs from the home page), using the Export button.
Increased limits #
Several feature have larger limits for Premium users - bigger designs, more colors, more complex WIF import. Specifics are mentioned throughout the documentation.
No Watermark #
Premium removes the "Generated by designer.notsorigidweaver.com" watermark.
If you have questions, don't hesitate to reach out to support@notsorigidweaver.com!